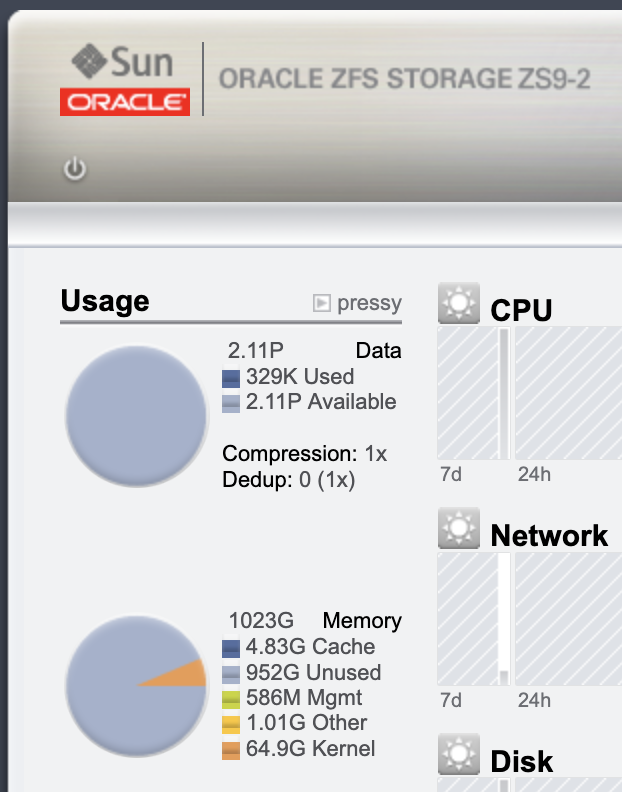
Last week I installed my first ZS9. Ah, I think I’m getting old… we calculate in petabytes now 😉
Category: Blog
First „free“ Oracle Solaris 11.4 CBE
Very great news in the Solaris universe; Oracle just announced a Common Build Environment (CBE) the first time for Solaris 11.4 operating system, free to use for non-productive and development environments.
Solaris 11.0 GA was released more than 10 years ago in 2011, 11.4 in August 2018, and with the switch to a continuous delivery model many new features have been added which were only available to customers with a valid support contract.
With the new CBE version everyone who is interested in Solaris can try and download it for a demo, PoC or to develop and build their own software on a „current“ version including features, updates and security patches.
Intial installation ISO images on the Oracle Solaris 11.4 downloads page are planned to be made available soon. Solaris is installed in 5 to 10 minutes on Virtual Box, perhaps there will be a ready to use image as well.
And Oracle intention is to periodically deliver CBE releases. If you are running an older Solaris 11.4 release like the GA with the default publisher repository you will be able to update using „pkg update“.
Oracle announced Solaris Support at least until 2034 some years ago. I hope that we will see a lot of CBE versions in the next 10+ years to give developers a chance and show everyone how cool, nice and easy but super mighty an UNIX can be 😉
The official blog by Darren Moffat:
https://blogs.oracle.com/solaris/post/announcing-the-first-oracle-solaris-114-cbe
Solaris 11.3 Restore rpool
I recently had the pleasure of restoring a Solaris IO domain backup on a T5-8 server. We lost the complete PCIe path to the local disks due to a hardware failure, but wanted to restore partial functionality for the guest LDOMs like vnet and at least one SAN HBA as soon as possible for more redundancy. To do this, I got a new SAN LUN and was able to restore the backup to it using a saved ZFS stream. To do this, I had to re-establish the network connections to be able to access the NFS share of the backups. First of all I had to boot from a Solaris medium, in my case it was a virtual ISO binding through my primary domain:
root@primary # ldm add-vdsdev options=ro /downloads/sol-11_3-text-sparc.iso sol11-3.iso@primary-vds root@primary # ldm add-vdisk sol11-3.iso sol11-3.iso@primary-vds io-domain
Now I had a recovery medium but to do my restore, I had to re-establish the network connections to be able to access the backup NFS share. In my case the whole server and LDOMs are connected to the network using a LACP datalink and cabsulated VLANs (I think CISCO would call it port channel vlan trunk).
BTW; the password for a Solaris installation ISO booted into single-user is “solaris”
{0} ok show-disks a) /pci@5c0/pci@1/pci@0/pci@8/SUNW,emlxs@0,1/fp@0,0/disk b) /pci@5c0/pci@1/pci@0/pci@8/SUNW,emlxs@0/fp@0,0/disk c) /virtual-devices@100/channel-devices@200/disk@0 d) /iscsi-hba/disk q) NO SELECTION Enter Selection, q to quit: c /virtual-devices@100/channel-devices@200/disk@0 has been selected. Type ^Y ( Control-Y ) to insert it in the command line. e.g. ok nvalias mydev ^Y for creating devalias mydev for /virtual-devices@100/channel-devices@200/disk@0 {0} ok boot /virtual-devices@100/channel-devices@200/disk@0 -s Boot device: /virtual-devices@100/channel-devices@200/disk@0 File and args: -s SunOS Release 5.11 Version 11.3 64-bit [...] Enter user name for system maintenance (control-d to bypass): root Enter root password (control-d to bypass): single-user privilege assigned to root on /dev/console. Entering System Maintenance Mode root@solaris:~# root@solaris:~# dladm show-phys LINK MEDIA STATE SPEED DUPLEX DEVICE net1 Ethernet up 10000 full ixgbe1 net4 Ethernet up 0 unknown vnet0 net3 Ethernet unknown 0 unknown vsw1 net5 Ethernet up 0 unknown vnet1 net2 Ethernet unknown 0 unknown vsw0 net0 Ethernet up 10000 full ixgbe0 root@solaris:~# ipadm delete-ip net0 Jun 4 13:10:29 in.ndpd[722]: Interface net0 has been removed from kernel. in.ndpd will no longer use it root@solaris:~# ipadm delete-ip net1 Jun 4 13:10:33 in.ndpd[722]: Interface net1 has been removed from kernel. in.ndpd will no longer use it root@solaris:~# root@solaris:~# dladm create-aggr -P L4 -L active -T long -l net0 -l net1 aggr0 root@solaris:~# dladm create-vlan -l aggr0 -v 1670 vl1670 root@solaris:~# root@solaris:~# ipadm create-ip vl1670 root@solaris:~# ipadm create-addr -T static -a 10.10.9.46/24 vl1670/prod0 root@solaris:~# root@solaris:~# ping 10.10.9.44 10.10.9.44 is alive <-- just a test to my primary root@solaris:~# root@solaris:~# route add default 10.10.9.1 add net default: gateway 10.10.9.1 root@solaris:~# ping 10.10.10.123 10.10.10.123 is alive <-- that's my NFS in another subnet root@solaris:~# root@solaris:~# dfshares 10.10.10.123 RESOURCE SERVER ACCESS TRANSPORT 10.10.10.123:/install 10.10.10.123 - - 10.10.10.123:/sysbackup 10.10.10.123 - - root@solaris:~# root@solaris:~# mount -F nfs 10.10.10.123:/sysbackup /mnt root@solaris:~# cd /mnt/zfssnap root@solaris:/mnt/zfssnap# ls -lathr rpool.t5sol03_* -rw-r--r-- 1 nobody nobody 41G Apr 18 02:06 rpool.t5sol03_2 -rw-r--r-- 1 nobody nobody 41G May 3 02:07 rpool.t5sol03_1 root@solaris:/mnt/zfssnap#
Ah, good to see, I got a backup being not so old, but in my case it's "just" an io-domain; so there is not really anything going on there, it's just providing redundant resources/paths for my guest LDOMs. I had to identify my new LUN which was easy because it was the only LUN without a label. You have to label it with VTOC (not EFI) to restore and make it bootable again:
root@solaris:/mnt/zfssnap# format Searching for disks...WARNING: /pci@5c0/pci@1/pci@0/pci@8/SUNW,emlxs@0/fp@0,0/ssd@w50060e8007296156,1c (ssd18): Corrupt label; wrong magic number WARNING: /pci@5c0/pci@1/pci@0/pci@8/SUNW,emlxs@0/fp@0,0/ssd@w50060e8007296156,1c (ssd18): Corrupt label; wrong magic number done c2t50060E8007296156d28: configured with capacity of 99.99GB [...] ^d root@solaris:/mnt/zfssnap# format -L vtoc -d c2t50060E8007296156d28 Searching for disks...WARNING: /pci@5c0/pci@1/pci@0/pci@8/SUNW,emlxs@0/fp@0,0/ssd@w50060e8007296156,1c (ssd18): Corrupt label; wrong magic number WARNING: /pci@5c0/pci@1/pci@0/pci@8/SUNW,emlxs@0/fp@0,0/ssd@w50060e8007296156,1c (ssd18): Corrupt label; wrong magic number done c2t50060E8007296156d28: configured with capacity of 99.99GB selecting c2t50060E8007296156d28 [disk formatted] WARNING: /pci@5c0/pci@1/pci@0/pci@8/SUNW,emlxs@0/fp@0,0/ssd@w50060e8007296156,1c (ssd18): Corrupt label; wrong magic number WARNING: /pci@5c0/pci@1/pci@0/pci@8/SUNW,emlxs@0/fp@0,0/ssd@w50060e8007296156,1c (ssd18): Corrupt label; wrong magic number WARNING: /pci@5c0/pci@1/pci@0/pci@8/SUNW,emlxs@0/fp@0,0/ssd@w50060e8007296156,1c (ssd18): Corrupt label; wrong magic number c2t50060E8007296156d28 is labeled with VTOC successfully. root@solaris:/mnt/zfssnap# root@solaris:/# echo | format | grep c2t50060E8007296156d28 43. c2t50060E8007296156d28
OK; ready to restore... after creating a new rpool I used the latest backup ZFS send stream. We created a VTOC label, so we need to use slice 0 to enable OBP boot.
root@solaris:/mnt/zfssnap# zpool create rpool c2t50060E8007296156d28s0 root@solaris:/mnt/zfssnap# zfs receive -Fv rpool < rpool.t5sol03_1 receiving full stream of rpool@t5sol03 into rpool@t5sol03 received 91.8KB stream in 1 seconds (91.8KB/sec) receiving full stream of rpool/swap@t5sol03 into rpool/swap@t5sol03 received 10.0GB stream in 45 seconds (228MB/sec) receiving full stream of rpool/dump@t5sol03 into rpool/dump@t5sol03 received 16.0GB stream in 72 seconds (228MB/sec) receiving full stream of rpool/VARSHARE@t5sol03 into rpool/VARSHARE@t5sol03 received 6.61MB stream in 1 seconds (6.61MB/sec) receiving full stream of rpool/VARSHARE/pkg@t5sol03 into rpool/VARSHARE/pkg@t5sol03 received 47.9KB stream in 1 seconds (47.9KB/sec) receiving full stream of rpool/VARSHARE/pkg/repositories@t5sol03 into rpool/VARSHARE/pkg/repositories@t5sol03 received 46.3KB stream in 1 seconds (46.3KB/sec) receiving full stream of rpool/VARSHARE/zones@t5sol03 into rpool/VARSHARE/zones@t5sol03 received 46.3KB stream in 1 seconds (46.3KB/sec) receiving full stream of rpool/export@t5sol03 into rpool/export@t5sol03 received 900KB stream in 1 seconds (900KB/sec) receiving full stream of rpool/ROOT@t5sol03 into rpool/ROOT@t5sol03 received 46.3KB stream in 1 seconds (46.3KB/sec) receiving full stream of rpool/ROOT/11.3.2.0.4.0@install into rpool/ROOT/11.3.2.0.4.0@install received 2.17GB stream in 16 seconds (139MB/sec) receiving incremental stream of rpool/ROOT/11.3.2.0.4.0@2015-09-30-11:24:26 into rpool/ROOT/11.3.2.0.4.0@2015-09-30-11:24:26 received 3.29GB stream in 20 seconds (168MB/sec) receiving incremental stream of rpool/ROOT/11.3.2.0.4.0@2015-10-15-08:39:59 into rpool/ROOT/11.3.2.0.4.0@2015-10-15-08:39:59 received 1.32GB stream in 10 seconds (136MB/sec) receiving incremental stream of rpool/ROOT/11.3.2.0.4.0@2015-11-05-10:05:16 into rpool/ROOT/11.3.2.0.4.0@2015-11-05-10:05:16 received 468MB stream in 6 seconds (78.0MB/sec) receiving incremental stream of rpool/ROOT/11.3.2.0.4.0@2015-11-16-10:04:06 into rpool/ROOT/11.3.2.0.4.0@2015-11-16-10:04:06 received 345MB stream in 5 seconds (68.9MB/sec) receiving incremental stream of rpool/ROOT/11.3.2.0.4.0@t5sol03 into rpool/ROOT/11.3.2.0.4.0@t5sol03 received 3.77GB stream in 23 seconds (168MB/sec) receiving full stream of rpool/ROOT/11.3.2.0.4.0/var@install into rpool/ROOT/11.3.2.0.4.0/var@install received 146MB stream in 1 seconds (146MB/sec) receiving incremental stream of rpool/ROOT/11.3.2.0.4.0/var@2015-09-30-11:24:26 into rpool/ROOT/11.3.2.0.4.0/var@2015-09-30-11:24:26 received 727MB stream in 5 seconds (145MB/sec) receiving incremental stream of rpool/ROOT/11.3.2.0.4.0/var@2015-10-15-08:39:59 into rpool/ROOT/11.3.2.0.4.0/var@2015-10-15-08:39:59 received 341MB stream in 2 seconds (171MB/sec) receiving incremental stream of rpool/ROOT/11.3.2.0.4.0/var@2015-11-05-10:05:16 into rpool/ROOT/11.3.2.0.4.0/var@2015-11-05-10:05:16 received 288MB stream in 2 seconds (144MB/sec) receiving incremental stream of rpool/ROOT/11.3.2.0.4.0/var@2015-11-16-10:04:06 into rpool/ROOT/11.3.2.0.4.0/var@2015-11-16-10:04:06 received 819MB stream in 6 seconds (136MB/sec) receiving incremental stream of rpool/ROOT/11.3.2.0.4.0/var@t5sol03 into rpool/ROOT/11.3.2.0.4.0/var@t5sol03 received 802MB stream in 5 seconds (160MB/sec) found clone origin rpool/ROOT/11.3.2.0.4.0@2015-11-16-10:04:06 receiving incremental stream of rpool/ROOT/11.2.15.0.5.1@t5sol03 into rpool/ROOT/11.2.15.0.5.1@t5sol03 received 89.9MB stream in 5 seconds (18.0MB/sec) found clone origin rpool/ROOT/11.3.2.0.4.0/var@2015-11-16-10:04:06 receiving incremental stream of rpool/ROOT/11.2.15.0.5.1/var@t5sol03 into rpool/ROOT/11.2.15.0.5.1/var@t5sol03 received 18.4MB stream in 1 seconds (18.4MB/sec) found clone origin rpool/ROOT/11.3.2.0.4.0@2015-11-05-10:05:16 receiving incremental stream of rpool/ROOT/11.2.15.0.4.0@t5sol03 into rpool/ROOT/11.2.15.0.4.0@t5sol03 received 179MB stream in 5 seconds (35.9MB/sec) found clone origin rpool/ROOT/11.3.2.0.4.0/var@2015-11-05-10:05:16 receiving incremental stream of rpool/ROOT/11.2.15.0.4.0/var@t5sol03 into rpool/ROOT/11.2.15.0.4.0/var@t5sol03 received 13.3MB stream in 1 seconds (13.3MB/sec) found clone origin rpool/ROOT/11.3.2.0.4.0@2015-10-15-08:39:59 receiving incremental stream of rpool/ROOT/11.2.14.0.5.0@t5sol03 into rpool/ROOT/11.2.14.0.5.0@t5sol03 received 179MB stream in 4 seconds (44.7MB/sec) found clone origin rpool/ROOT/11.3.2.0.4.0/var@2015-10-15-08:39:59 receiving incremental stream of rpool/ROOT/11.2.14.0.5.0/var@t5sol03 into rpool/ROOT/11.2.14.0.5.0/var@t5sol03 received 13.3MB stream in 1 seconds (13.3MB/sec) found clone origin rpool/ROOT/11.3.2.0.4.0@2015-09-30-11:24:26 receiving incremental stream of rpool/ROOT/11.2.10.0.5.0@t5sol03 into rpool/ROOT/11.2.10.0.5.0@t5sol03 received 16.8MB stream in 1 seconds (16.8MB/sec) found clone origin rpool/ROOT/11.3.2.0.4.0/var@2015-09-30-11:24:26 receiving incremental stream of rpool/ROOT/11.2.10.0.5.0/var@t5sol03 into rpool/ROOT/11.2.10.0.5.0/var@t5sol03 received 9.42MB stream in 1 seconds (9.42MB/sec) root@solaris:/mnt/zfssnap# root@solaris:/mnt/zfssnap# zfs list | grep rpool rpool 67.0G 30.9G 73.5K /rpool rpool/ROOT 14.2G 30.9G 31K legacy rpool/ROOT/11.2.10.0.5.0 11.5M 30.9G 4.29G / rpool/ROOT/11.2.10.0.5.0/var 4.34M 30.9G 400M /var rpool/ROOT/11.2.14.0.5.0 126M 30.9G 4.42G / rpool/ROOT/11.2.14.0.5.0/var 5.75M 30.9G 406M /var rpool/ROOT/11.2.15.0.4.0 127M 30.9G 4.43G / rpool/ROOT/11.2.15.0.4.0/var 5.76M 30.9G 416M /var rpool/ROOT/11.2.15.0.5.1 39.5M 30.9G 4.42G / rpool/ROOT/11.2.15.0.5.1/var 7.44M 30.9G 531M /var rpool/ROOT/11.3.2.0.4.0 13.9G 30.9G 4.87G / rpool/ROOT/11.3.2.0.4.0/var 2.92G 30.9G 868M /var rpool/VARSHARE 6.65M 30.9G 6.56M /var/share rpool/VARSHARE/pkg 63K 30.9G 32K /var/share/pkg rpool/VARSHARE/pkg/repositories 31K 30.9G 31K /var/share/pkg/repositories rpool/VARSHARE/zones 31K 30.9G 31K /system/zones rpool/dump 32.5G 47.4G 16.0G - rpool/export 802K 30.9G 802K /export rpool/swap 20.3G 41.2G 10.0G - root@solaris:/mnt/zfssnap#
That took some minutes, you can see it's quite fast over a 10g network to a SAN LUN.
Now we have to make the pool and the disk bootable installing a bootloader, again VTOC slice 0.
root@solaris:/mnt/zfssnap# zpool set bootfs=rpool/ROOT/11.3.2.0.4.0 rpool root@solaris:/mnt/zfssnap# root@solaris:/mnt/zfssnap# beadm mount 11.3.2.0.4.0 /tmp/mnt root@solaris:/mnt/zfssnap# installboot -F zfs /tmp/mnt/platform/`uname -i`/lib/fs/zfs/bootblk /dev/rdsk/c2t50060E8007296156d28s0 root@solaris:/mnt/zfssnap# beadm umount 11.3.2.0.4.0 root@solaris:/mnt/zfssnap# beadm activate 11.3.2.0.4.0 root@solaris:/mnt/zfssnap# cd / ; umount /mnt root@solaris:/# init 0
The last step is to identify the LUN in OBP; in my case we saw it had the SCSI LUN depth identifier "d28" in the end; in older device naming conventions "d" stands for "drive number". It's the 28th LUN from this HDS storage; in OBP we need to convert it from "base 10" to hexadecimal -> that's "1c" then (16based).
root@solaris:/# echo | format | grep c2t50060E8007296156d28 43. c2t50060E8007296156d28
So we will take the hardware path, which you already saw in the format output before; but you could also see it using "show-disks" or "probe-scsi-all" in OBP and add the WWN, you would see again in your "probe-scsi-all" output or the "super long" SCSI address in your format menue, followed by the "drive number" and slice "0":
{0} ok devalias backupdisk /pci@5c0/pci@1/pci@0/pci@8/SUNW,emlxs@0/fp@0,0/disk@w50060e8007296156,1c:0 {0} ok setenv boot-device backupdisk {0} ok boot Boot device: /pci@5c0/pci@1/pci@0/pci@8/SUNW,emlxs@0/fp@0,0/disk@w50060e8007296156,1c:0 File and args: SunOS Release 5.11 Version 11.3 64-bit Copyright (c) 1983, 2015, Oracle and/or its affiliates. All rights reserved. Hostname: io-domain io-domain console login:
YEAH! It's up again 😉
If you know all steps and commands, such a full Solaris OS restore takes about 10-15 minutes; that's really nice and "easy". Hope you will never get in that situation but always remember, that backup was just done by sending a ZFS snapshot archive to an external NFS. To commands could save your "life":
# zfs snapshot -r rpool@backup # zfs send -R rpool@backup > /NFS
I don't say that's the solution for all circumstances; and you could automate many steps for that; but as an admin, it so much easier to get the full OS back than handling a third party backup tool with bare metal restores in case of emergency. After restoring your OS you will have your backup-agent running properly again and could restore application data if needed.
Stay save and have fun!